

Showing posts with label Projects/Photography. Show all posts
Showing posts with label Projects/Photography. Show all posts
8.20.2011
Future easy sewing project (DIY burp cloths)
Numerous people have told me not to get the cutesy burp cloths cause they just don't work well. Supposedly the best absorbant cloths are the Gerber prefold 6-ply diapers, so I'm registering for a couple packs of those. They are just plain white and nothing fancy...which is fine with me. But then I saw this super cute idea on Etsy where fabric was sewn just on one side-- I thought it added a cute touch, but then still left the other side all absorbant and plain. I think I'll get some cute fabrics and give this a whirl...assuming I have enough spare time between getting these and the baby!

8.18.2011
Easy DIY baby blanket
I know I've been a bad blogger lately, but hopefully I'll have some good posts coming up here. For today, I have a new topic/hobby....SEWING!!!
I had seen a really cute idea on Amanda's blog (here) to do a rag quilt, but was skeptical that I'd actually be able to do this. The only time I have sewn something was back in Home Econ in 7th & 8th grade. My sewing machine was still in the box from xmas...so I figured I didn't have much to lose and would take a stab at making a really small baby blanket. And at least if it didn't turn out well, it's not like a baby is going to be too picky!
I looked up some instructions on the internet, but ultimately just kinda made it up as I went. The instructions I saw all called for the cotton squares on the front and back of the quilt, but you'll see that I just did the front like that and used soft minky baby fabric for the back.
First step was to go to the fabric store and pick a few items up. Luckily for me, they had a bundle of blue/orange/brown fabrics already cut to about 6x6...so I bought those since would save me the initial step of cutting down my fabric into squares. It came in a pack of 20 squares and ended up being a perfect little size. I also bought some white minky fabric for the back just because I LOVE how soft it is...it just oozes baby when you see and feel it!
1. Design your layout.
First I arranged the squares on our coffee table with 4 squares across each row and 5 columns high...then after way too much thinking/consideration, ended up with a pattern I was pleased with.
2. Pin and Sew Squares to form Rows
I used pins to pin the 4 fabric squares of each row together. I pinned at least 1 inch from the edge.
I sewed the pinned seams together to form a row. I tried to sew about a half inch from the edge.
Repeat this for all of your rows.


3. Pin and Sew Rows to form columns
Now it is time to pin 2 rows together and sew them. I started with my bottom 2 rows and just kept working my way up....pinning and sewing. At this point my blanket looked pretty bad, but trust me that even if you sewed crooked or however, it will probably look fine. Just sew over seams however you want-- you'll end up cutting these anyways, so it really does not matter- you can see how caddy-wompous some of mine looked.


4. Wash blanket
At this point, your entire front should be sewn together and somewhat look like a blanket. I washed and dried my blanket at this point so that it would shrink to size since it was cotton and I was using minky for the back, which most likely would not shrink. The edges will start to fray a tad.


5. Cut, pin, sew backing
I then cut a piece of the minkey fabric just slightly larger than the blanket and pinned on the back of the blanket. I had read to pin this very well cause he fabric is soft and moves around very easily. I sewed about a half inch from the edge around the whole perimeter of the blanket. This was very difficult for me to sew this straight and have it look good, so my advice would be to take it very slow here. I also learned afterwards that I could have used white thread in my bobbin, which would have looked better on my minky backing and not shown how crooked I sewed.

I then trimmed the backing so that it was slightly smaller than the size of my blanket. I probably could have avoided this step by cutting the minky to the correct size to start with :)

6. Rag the quilt
This was the most excruciating step-- with a good pair of scissors, cut slits in every single seam so that it will fray better. I made my slits probably 1/4 inch. You can also buy a tool at the fabric store to snip these cuts which probably works a lot easier.
Wash several times to fray and you are done!

7.16.2011
Easy DIY Photo Collage
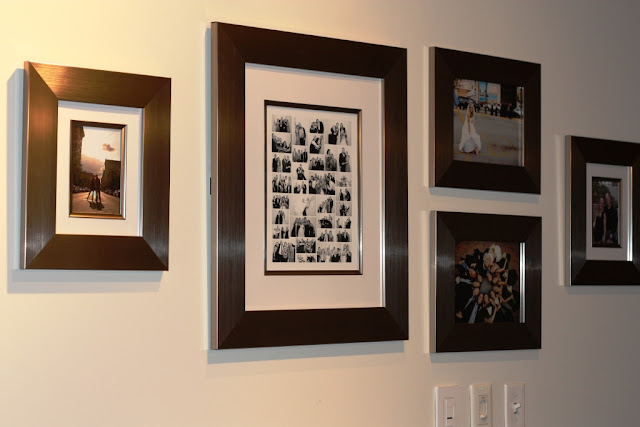
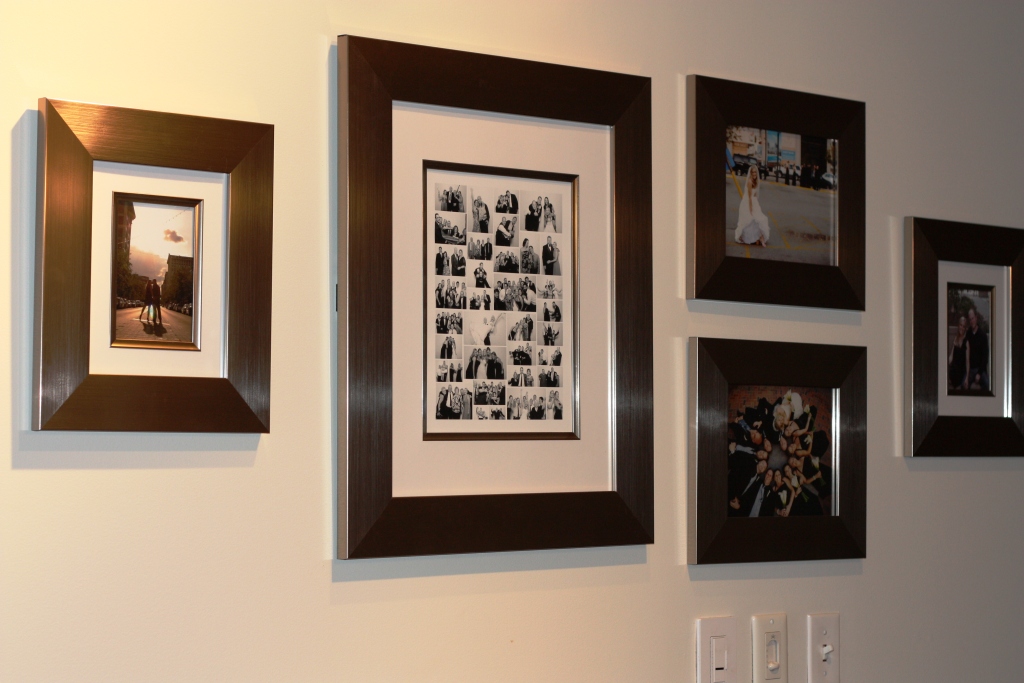
I had bought some frames on sale at Michael's probably about 2 years ago-- I had hung them on the wall and filled the smaller frames, but didn't have anything in the 11x14 frame.
I decided to do a collage of photos from our wedding from the photo studio. I used Microsoft Office Publisher and it took me less than an hour. I inserted a bunch of the pictures and then just started making them different sizes. I would also crop some of the pics where there was dead space. I just worked my way across and down the page to keep filling it in.
I took it to Office Depot on a flash drive and they printed on 11x17 glossy, thick paper for only $.49! What a steal! Walgreens and most photo sites wanted at least $9.99 to print. I have another 11x14 frame to fill, so I'm definitely going to put something together and get it printed there.
Here's some pics of the finished product:

5.11.2011
T-shirt Quilt
Ok, I've been a HUGE slacker and need to get back to blogging. Here is a short post, but something I thought was really cool. So back in high school I had heard about this idea and thought it would be cool to have my mom make me one. I had a lot of t-shirts from over the years that were memories of vacations, school sports, etc. You may not want to really wear these around anymore, but you want to save them...so what better way then to turn them into a blanket! Well my poor mom has been working on this for like almost 10 years I think now cause she did one for my sister also...but the time was well spent, cause it turned out awesome! If you look around on the internet, you will find tons of pictures and different ways people have gone about these...luckily I like mine the best!
Here is the entire thing laid out:

Here is a closeup of one of the t-shirt squares:

Here you can see some of the different materials and stitching done:

And lastly, here is the material that is on the entire back:

Here is the entire thing laid out:

Here is a closeup of one of the t-shirt squares:

Here you can see some of the different materials and stitching done:

And lastly, here is the material that is on the entire back:

Great job mom!
12.14.2010
T-shirts recycled!
I've seen this idea on a few blogs and thought I'd give it a try while trapped inside with the snow yesterday! One lucky person (that does not read this blog) will be getting this as a xmas gift...and if she thinks it's ugly, then she can throw away since it was free! I made a scarf out of old t-shirts...and thought it turned out decent. Don't think it's going to rock anyone's world, but is unique!

Here's what I did: Grab 1 or more old t-shirts. (I used some of Dustin's since he has I swear over 100 t-shirts piled up.) I picked Orange and Blue for Illini colors. I cut about .5-.75 inch strips across the shirt. Then wrap each strip several times around your hand to make it into a loop. Take small pieces of the shirt fabric (can use sleeves) to tie in a double knot to tie 2 of the loops together. Continue in this fashion and can leave open at the end or tie it into a circle.

Here's what I did: Grab 1 or more old t-shirts. (I used some of Dustin's since he has I swear over 100 t-shirts piled up.) I picked Orange and Blue for Illini colors. I cut about .5-.75 inch strips across the shirt. Then wrap each strip several times around your hand to make it into a loop. Take small pieces of the shirt fabric (can use sleeves) to tie in a double knot to tie 2 of the loops together. Continue in this fashion and can leave open at the end or tie it into a circle.
9.29.2010
Alphabet Art- Trial #1
So, one of the things I was going to treat myself too with wedding gift money was buying some framed photography alphabet art. If you've never seen this, I think it is pretty cool-- people find architecture or things in nature or a natural form and photograph it in a way that it looks like a letter of the alphabet. You then can spell out your name- or whatever you like. Click here to see an example of a website selling this. When all is said and done, it's pretty expensive to order online...and the more I got to thinking about it, the more I wanted to do the pictures myself and have them mean something to Dustin and I. Then we'll just pay to get them framed nicely.
So, on our anniversary when we went back to the Botanical Gardens to walk around, we took pictures of things that spelled OBRIEN. Some letters were MUCH easier than others!! For about an hours worth of work, I think we did pretty good...the N is the only thing we were really disappointed in and we had found at least 3 different shapes for N!
But now my dilemna is do I make my print with all items from the botanical gardens and reminds me of our wedding....or do I do from a bunch of different places that have some sort of meaning to us? I kinda like the latter, but dustin likes the first. I'd like to use an Eiffel Tower pic for the I to remind us or our time in Europe and I think the Arch here in St. Louis would make a good N.
So, here's what we have so far from the gardens:

7.25.2010
Detergent Review :)
So next up I tried not diluting the mixture in the 5 gallon bucket. I researched some other recipes and none were as diluted as much as mine was, so I think they were just trying to stretch this one a little too far! I took an older towel and rubbed into it Ketchup, Mustard, Toothpaste, and liquid foundation Makeup. My homemade detergent took everything out 100% except the makeup. Next up, repeated the same test with my store detergent and......the same result! The store detergent didn't take the makeup off any better, so I think I've now achieved the same product as what I was buying! Doing more loads of laundry tonight with it, so am crossing my fingers no surprises pop up!
7.19.2010
Detergent Review :(
So I tried a load of laundry last night with the detergent I made. I took an old towel and rubbed ketchup and mustard into it as a test. At first glance when it came out of the laundry it looked clean...but upon further examination you could see faintly where the food was. And I'm pretty sure my normal store detergent would have been able to take care of it. So, I've been researching other recipes and user comments and am going to try another test without diluting the soap mixture. So basically I'm just going to try using it straight from the 5 gallon bucket...whereas before I used half mixture from my bucket and half water. I'll report back!
7.17.2010
Detergent
I think Dustin seriously thinks I've gone off the deep-end lately, but he's golfing all day today so I'm taking advantage of the free time to do more crazy stuff.
First, one thing that drives me bonkers is dustin will never drink water at home...it's always milk, juice, gatorade, etc. It's at least good it's all healthy stuff rather than soda, but seems to get expensive when he drinks SO much of it over the free water that he could be using! So today I found that Gatorade makes a powder that you mix with water to make your own gatorade which is WAAAAAAAAY cheaper than the premade bottles we always buy. So I mixed some of that up and will see what he thinks of this!

Next, I've read on some other blogs of people making their own laundry detergent and it saves them a ton of money....so I thought why not give that a stab?! Here's the supplies I had to buy--

5 Gallon Bucket- on sale at Lowe's for $1
Fehls Napa bar- $2.29
Arm & Hammer Washing Soda- $3.29
Borax- $2.79
So even if this is total disaster, I haven't wasted much money cause I can still use the bucket, washing soda, and borax for things. Basically I'm just out my $2 bar of soap.
So you start by grating the bar of soap into a pot on low heat and just dissolve it to make soapy water. It dissolved VERY easily, but did take a while to grate!

I then put the bucket in the bath tub (since we never use) and filled it half way with hot water. Then I added 1 cup washing soda and 1/2 cup Borax and stirred until dissolved. I added my soapy mixture and gave it a swish. Then you add more hot water to fill to the top. Stir a little more and cover. My bucket didn't have a lid, so I've just used Saran Wrap.

I'll let it sit overnight and it should thicken. And then I can fill some containers halfway with the mixture and the other half with water and it gels into detergent. I'll end up with 10 gallons total and use 1/4 cup for each load...so this is going to last like all year I swear and theoretically each time I make this only costs less than $3!
Click here for a link to the recipe.
7.12.2010
Photography Practice
So on Sunday I met up with some girls I know through a local message board from when I was planning the wedding cause there are a lot of us trying to learn how to use our cameras to take awesome pictures. So we got together at City Garden hoping that some of the more experienced could teach us some things...however, of the people that went we were all fairly close to the same level. But I did pick up a few things!
First, one of the girls shared a project she is working on called the 100 Snapshot Challenge where your object is to photograph 100 pictures that capture the word on the list. The words are such things like love, concrete, dirty, fresh, etc. So I eventually may start trying this...but for now am just focusing on practicing.
Second, I never really used the "Close-up" setting on my camera-- frequently looks like a little flower on your camera. It never seemed to do anything for me, but I learned that I wasn't getting close enough to my objects. I found a bee on a flower and got right up on it with this setting and think it turned out pretty well. Also used it on this daisy.


Third, I learned you can take off your lens and just hold it up to your camera backwards and it makes an extreme macro lens. It's a little tricky to do, but once you get it just right you can get some great detail! I had a bad case of the shakes so definitely did not get it as clear as it should be, but I can't wait to experiment with this more. This is a quarter and I did no zoom or cropping of the original picture.

Here were just some of the better pics I felt I got...nothing very great, but gotta learn somehow! This poor girl got squirted with the water in her eyes :))


5.08.2010
Morning project
 So riddle me this....normally during the week I go to bed at 9:30 and struggle to drag myself out of bed at like 7:15. Even on the weekends if Dustin and I are just home watching a movie, it's rare I'll make it past 11pm. So now that he's out of town, I was up wide awake until 1:30 last night just cleaning and watching tv! And then wake up at 6:30 this morning ready to go and out of bed at 7! I really think Dustin just sleeps a lot and it must have some effect that transfers onto me. So this morning I took a break from some cleaning to work on a project...but didn't turn out 100%. So I had picked up these cheap frames at Michaels for only $7 and had this idea of instead of putting a picture in one of the large ones, to do something with words. So I just created a document in MS Word that had all the lines of our vows from the wedding. Unfortunately I then printed it on paper that I THOUGHT was the size of the opening in the frame....but was wrong. So for the time being I just improvised by added some black cardstock behind the document, so works for now and until I make the time and effort to print on the right size. I'm starting to feel like our place looks like a marriage shrine to us though! But I guess until we have kids, we don't have many other good things to frame. And I have so many frames from the wedding that I gotta fill them with pics of us!
I did this a while ago, but I also filled 4 of my frames with 8x10s of wedding pics and posted down our hallway. I used MPIX to print the photos and was really pleased with how they turned out. For the colored photos I chose a metallic-type finish and it's pretty cool.
4.21.2010


4.14.2010
Photography Assignment Week 2
So I actually completed this some time ago, but the weather has been so incredibly awesome that I have fallen behind in posting! So Week 2 was learning about ISO and speed-- my assignment was to set me camera to different speeds and photograph runinng water. I went over to the City Garden since they have a small waterfall and some water fountains. I captured the shot with a fast speed, meaning the shutter is open for a very short period and it gives the effect of freezing the water in time. I then captured it with a slow speed, meaning the shutter is open longer and you can really see the water flowing.
Exposure: 1/1000 sec.
F-Stop: 1/5.7
ISO: 200

Exposure: 1/25 sec.
F-Stop: f/36
ISO: 200

Exposure: 1/1000 sec.
F-Stop: 1/5.7
ISO: 200

Exposure: 1/25 sec.
F-Stop: f/36
ISO: 200

3.30.2010
I need my photoshop back!!!!!!!
Well my free trial of Photoshop products has expired....boooooooo! Unfortunately it is $1000 to buy the real thing, which is WAY too much. However, there is a student version available for only a couple hundred, so I'm thinking about going that route-- just gotta have someone with a valid student ID submit the order. I thought I'd walk down and snap some pics of the arch and I didn't think I'd be able to get any good shots with my lens....but this one turned out good EXCEPT for those stupid branches up top and I don't have photoshop to remove those now! GRRRRRRRRRRR. I don't think I'll have any good pics without photoshop cause there is always something to fix!


3.29.2010
Photography Assignment Week 1
I saw where a few girls from a message board I belong to are also trying to learn how to use their DSLR camera. And they are following a blog's tutorial called Twelve Weeks to Better Photos. Since I pretty much suck at using the camera, I figured I should give it a stab too! The only way to really learn is just keep practicing, so now that the nicer weather is here I'm hoping I'll get loads of practice in!
Our assignment for the first week was to learn about aperture (http://is.twopeasinabucket.com/photocourse/weekone.pdf). Basically I took a picture of this flower clip I had on a tree and set my aperature 3 different ways. The size of the aperture, or f/stop, of a lens determines how much of your photograph is in focus. The smaller the f/stop, the less that is in focus. You'll see in the first picture it had a low f-stop and the background is really blurry. In the next picture, the background is more in focus and in the last picture I kept the whole thing in focus.
Pic 1- f/4.5

Pic 2- f/10

Pic 3- f/24

11.24.2009
Photoshop 101 continued
So I haven't had much time to continue practicing with photoshop, but plan to do so this weekend. This again probably isn't that great, but just goes to show what you can do with some color enhancement here to make the colors a little more vivid- notice his shoes, shirt, and the water. I also then deleted out some of those smokestacks and people in the background. I also then tried to straighten it out some since the skyline was a little crooked originally. Since these are really slow to upload, this is all I have the patience to share right now!


11.17.2009
Photoshop 101
So we had a lazy day on Saturday and I spent it learning how to try to use Photoshop. I'd been doing some research on the internet and spent Saturday doing a lot of tutorials and practice. I downloaded a trial of Photoshop Elements which is a cheaper, stripped down version of Photoshop....so it's been fun, but am thinking I'll also evaluate the full Photoshop cause am thinking there are some things in there that would be worth the money. I'm going to try to share some of my photoshop adventures and creations...no laughing cause I've spent ONE DAY trying to learn this!


More to come, but these are taking FOREVER to load and it's time for bed!
Here's example where I feel like I drastically improved the color of the picture to make it much brighter and more colorful.


Here is me using my skills to delete our that pipe on the left and just make the picture look a little more artistic:

Subscribe to:
Posts (Atom)